If you’re looking for the location of skill mentor Leuro-Khian on the Republic Fleet, here’s the map location:
This is the person you go to reset your skill tree on the Republic Fleet.
MMOs, Console Games and anything else with buttons
If you’re looking for the location of skill mentor Leuro-Khian on the Republic Fleet, here’s the map location:
This is the person you go to reset your skill tree on the Republic Fleet.
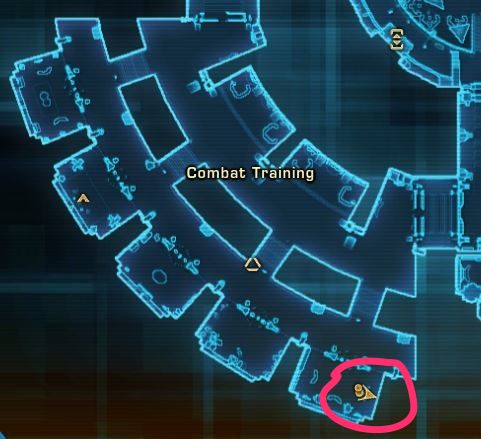
If like me you’ve accumulated a bunch of premium or ancient gift fragments in SWTOR, you might be wondering what to do with them. You need to go see the Curator, whose name is Luna on the Republic Fleet. Here’s the location:
Hope that helps – the Curator on the Imperial Fleet is in the same location.
 One of the coolest things about The Secret World is the investigation missions. They require brains instead of finger-mashing, which is why the game has a built in web browser for research. Which is probably what has brought you here. The below answers are ones I found out myself – I’d suggest you do the same but if you want the easy way out, read on:
(this help guide will grow as I progress through the game – bear with me!)
Men in Black Vans: what is the laptop password?
Answer: (non-spoiler) – go to the URL shown on the black suited bodies lying near the van and look up Kitsune’s wife at that URL. (spoiler) ‘sally’ is the password.
Men in Black Vans: where is the tracker I need to use?
Answer: right next to the laptop, adjust your camera angle and you’ll see it just to the left of the laptop in the back of the van. I didn’t see it for ages because I had my camera angle too low.
Men in Black Vans: how do I disassemble the tracker?
Answer: (non-spoiler) there’s a combination you need to do in the right order. If you get it wring you’ll see the component fizzle and hear a noise. It’ll also attract a bigger monster out of the sea so head back up the beach unless you want a fight. (spoiler) Select the component on the East side of the unit (facing the sea), then the South side and then West side. That’s what worked for me anyway.
I Phone Home: how do I give the tablet to Danny?
Answer: just left click on him once. Believe it or not took me a while to work this out.
ATC: how do I use the security keypad to get in to disable the EMP generator?
Answer: (non-spoiler) Kill the draug in the area and just near where he was standing you’ll find your answer. (spoiler) Passcode is 739241. And don’t forget to put on your Orochi uniform from your inventory (it is looted automatically from the body you examine – although you may need to examine both bodies to get one to fit).
Dawn of an Endless Night: what is the password on Dr Bannerman’s computer?
Answer: (non-spoiler) Dr Bannerman likes classical music based on the photo you examine. (spoiler) Google ‘Four Seasons Classical’ and you’ll get your answer.
Dawn of an Endless Night: how do I find the trail left by Beaumont?
Answer: (non-spoiler) You need to search around the airport based on the picture you’re shown. (spoiler) Go to the shed/shack that’s at the furthest west of the airport (just above the scrapyard). It has the same scenic flight sign as in the picture.
Dawn of an Endless Night: how do I unlock the door to the Illuminati tunnel?
Answer: (non-spoiler) Collect the items around the room, read the book on the desk near the door, which gives you the hints. (spoiler) In order, insert the Yin and Yang, Skull, Phoenix, Pyramid and The Eye, then the door will open.
Dawn of an Endless Night: Where is the Illuminati vault?
Answer: (non-spoiler) Find the Order of Great Works book just inside the entrance of the instance. Collect the items from each of the rooms (both levels) and then search for the vault. (spoiler) Find the loose floorboards in the northern end room on the ground floor. Jump down and you’ll come to a door. Same deal as the previous tunnel door – insert (in order) the Star of David, Masonic Symbol, The Eye, skull and finally the Templar Cross.
They Never Stop Coming: where are the Slow and Dry Zombies?
Answer:(non-spoiler) Go to the North West of the main township. (Spoiler) It’s zombies like the Charred Remains and Witch Trial Victims that fit into this category.
They Never Stop Coming: where are the Zombie Cultists?
Answer: (non-spoiler) Have a good wander around the back areas of Kingsmouth and you’ll find them. (Spoiler) Behind Norma’s house.
Tomb Raider: where is Eric and Mindy’s Grave?
Answer: (non-spoiler) Work your way around the graveyard and it’s there, but not in the easiest areas. (Spoiler) With your back to the church, it’s in the second back row on the right half near the fence.
Into Darkness: how do I get to New York?
Answer: via Agartha – I stupidly kept going to the record shop because there was a yellow cross there….
Into Darkness: where is the rendezvous point?
Answer: (non-spoiler) near a truck with flashing lights in a lower level of the parking garage. (Spoiler) Walk right up to the corpses in the corner on the lowest level.
Horror Show: where is the camera at the mining museum?
Answer: (non-spoiler) it’s in the top half of the building. (Spoiler) You climb the ladder on the building behind the mining museum, jump across to the museum and you’ll find the camera at the front of the musuem on the little overhang.
The League of Monster Slayers: what is the order of initiation?
Answer: here’s the map – click on it for the full-size version:
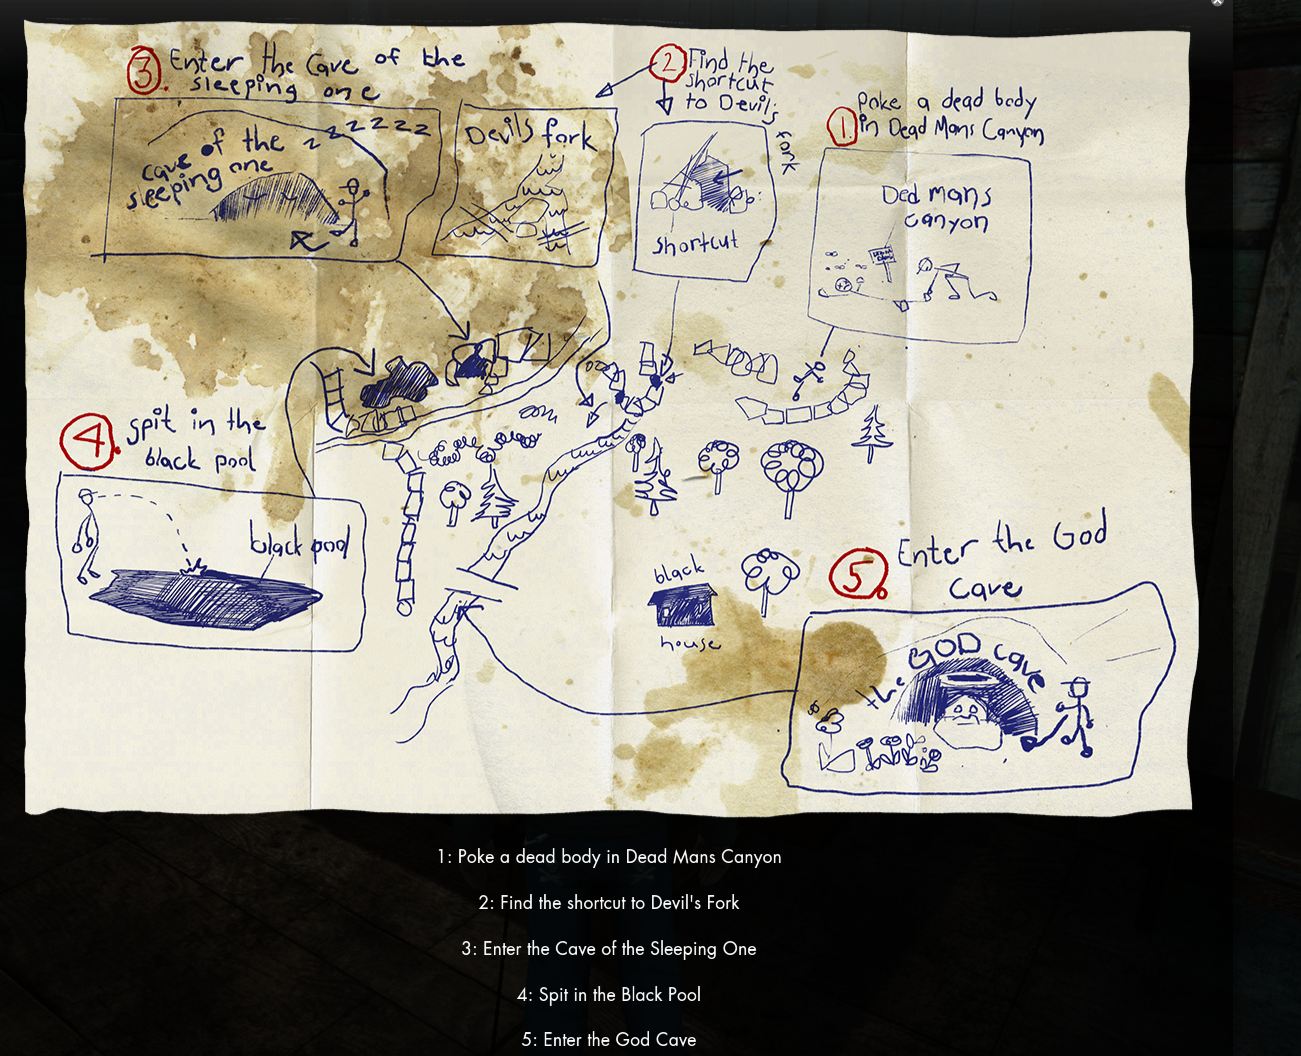
The League of Monster Slayers: where is the body I need to poke?
Answer: (non-spoiler) Look around the immediate area after you discover Dead Man’s Canyon. (spoiler) There;s a small dark head poking out of the ground. Mouse over that and it’ll be labelled as ‘The Body’ – right click to poke it.
Science And The Arts: where are the blueprints in the headmaster’s office?
Answer: (non-spoiler) Don’t make the mistake like I did of thinking the headmaster’s office is where you talk to him. (spoiler) The blueprints are on the wall in the headmaster’s office which is directly on the floor above where you talk to him.
If you’re wanting a high-quality glimpse of some of SWTOR’s key Operations, then it’s hard to go past the recently formed YouTube channel for Republic Oceanic Guild Legion of Silver Suns (LoSS). Based on The Harbinger server at present, they’ve got some great vids, as you can see below:
LoSS Vs Karagga HM
LoSS Vs Foreman Crusher HM
LoSS Vs Jarg and Sorno HM
LoSS Vs Bonethrasher HM
LoSS Vs Soa HM
LoSS Vs Infernal Council HM
LoSS Vs Pylon Boss HM
LoSS Vs Gharj HM Eternity vault
LoSS Vs Eternity vault Annihilation Droid XRR-3 HM
Thanks to James over at SWTOR Gamers of Oceania Facebook Group for the heads-up
Now that SWTOR update 1.2 has hit the public test servers, we’re able to give some more in-depth information on the long awaited Combat Log. It’s format isn’t the prettiest yet, but it sure packs in a lot of information. Let’s look at the first section of a battle from a Sith Sorceror’s perspective, where he/she (Khantni) is getting ready to start:
[03/01/2012 14:19:04] [@Khantni] [@Khantni] [Safe Login {973870949466112}] [ApplyEffect {836045448945477}: Safe Login Immunity {973870949466372}] ()
[03/01/2012 14:19:18] [@Khantni] [@Khantni] [Safe Login {973870949466112}] [RemoveEffect {836045448945478}: Safe Login Immunity {973870949466372}] ()
[03/01/2012 14:23:30] [@Khantni] [@Khantni] [Sprint {810670782152704}] [Event {836045448945472}: AbilityActivate {836045448945479}] ()
[03/01/2012 14:23:30] [@Khantni] [@Khantni] [Sprint {810670782152704}] [ApplyEffect {836045448945477}: Sprint {810670782152704}] ()
[03/01/2012 14:24:30] [@Khantni] [@Khantni] [Innervate {1104395005591552}] [Event {836045448945472}: AbilityActivate {836045448945479}] ()
[03/01/2012 14:24:30] [@Khantni] [@Khantni] [] [Spend {836045448945473}: Force {836045448938502}] (36)
[03/01/2012 14:24:30] [@Khantni] [@Khantni] [Force Surge {808677917327360}] [ApplyEffect {836045448945477}: Force Surge {808677917327360}] ()
[03/01/2012 14:24:30] [@Khantni] [@Khantni] [Innervate {1104395005591552}] [ApplyEffect {836045448945477}: Heal {836045448945500}] (1393*)
The display of that data can be a little overwhelming at first, so this key provided by BioWare’s Georg Zoeller helps quite a bit:
(Click here for the full-size image)

See how it makes a little more sense now? Let’s look at a sample log, this time from a Jedi Guardian’s perspective:
[03/01/2012 14:23:50] [@Idrurrez] [@Idrurrez] [] [Restore {836045448945476}: focus point {836045448938496}] (1)
[03/01/2012 14:23:50] [@Idrurrez] [@Idrurrez] [Force Leap {812105301229568}] [Event {836045448945472}: AbilityActivate {836045448945479}] ()
[03/01/2012 14:23:50] [@Idrurrez] [@Idrurrez] [Momentum {2530075039760384}] [ApplyEffect {836045448945477}: Momentum {2530075039760642}] ()
[03/01/2012 14:23:50] [@Idrurrez] [@Idrurrez] [Unremitting {1280849441980416}] [ApplyEffect {836045448945477}: Unremitting {1280849441980416}] ()
[03/01/2012 14:23:50] [@Idrurrez] [@Idrurrez] [ {2695018963795968}] [ApplyEffect {836045448945477}: Vindicator {2695018963796231}] ()
[03/01/2012 14:23:50] [@Idrurrez] [Elite Tastybobble {846623953387520}] [Force Leap {812105301229568}] [ApplyEffect {836045448945477}: Immobilized {812105301229840}] ()
[03/01/2012 14:23:50] [@Idrurrez] [Elite Tastybobble {846623953387520}] [Force Clap {2848585519464448}] [ApplyEffect {836045448945477}: Stunned (Physical) {2848585519464704}] ()
[03/01/2012 14:23:50] [@Idrurrez] [@Idrurrez] [] [Restore {836045448945476}: focus point {836045448938496}] (3)
[03/01/2012 14:23:51] [@Idrurrez] [Elite Tastybobble {846623953387520}] [Force Leap {812105301229568}] [ApplyEffect {836045448945477}: Damage {836045448945501}] (698 energy {836045448940874}) <698>
[03/01/2012 14:23:52] [@Idrurrez] [@Idrurrez] [Master Strike {812139660967936}] [Event {836045448945472}: AbilityActivate {836045448945479}] ()
[03/01/2012 14:23:52] [@Idrurrez] [@Idrurrez] [Master Strike {812139660967936}] [ApplyEffect {836045448945477}: Unshakable {812139660968471}] ()
[03/01/2012 14:23:52] [Elite Tastybobble {846623953387520}] [@Idrurrez] [Ranged Attack {813449625993216}] [ApplyEffect {836045448945477}: Damage {836045448945501}] (261 energy {836045448940874}) <261>
[03/01/2012 14:23:52] [Elite Tastybobble {846623953387520}] [@Idrurrez] [Ranged Attack {813449625993216}] [ApplyEffect {836045448945477}: Damage {836045448945501}] (273 energy {836045448940874}) <273>
[03/01/2012 14:23:52] [Elite Tastybobble {846623953387520}] [@Idrurrez] [Ranged Attack {813449625993216}] [ApplyEffect {836045448945477}: Damage {836045448945501}] (276 energy {836045448940874}) <276>
[03/01/2012 14:23:52] [@Idrurrez] [Elite Tastybobble {846623953387520}] [Master Strike {812139660967936}] [ApplyEffect {836045448945477}: Damage {836045448945501}] (874 energy {836045448940874}) <874>
[03/01/2012 14:23:52] [@Idrurrez] [Elite Tastybobble {846623953387520}] [Force Clap {2848585519464448}] [RemoveEffect {836045448945478}: Stunned (Physical) {2848585519464704}] ()
[03/01/2012 14:23:52] [@Idrurrez] [Elite Tastybobble {846623953387520}] [Master Strike {812139660967936}] [ApplyEffect {836045448945477}: Damage {836045448945501}] (904 energy {836045448940874}) <904>
[03/01/2012 14:23:53] [Elite Tastybobble {846623953387520}] [@Idrurrez] [Melee Attack {813445331025920}] [ApplyEffect {836045448945477}: Damage {836045448945501}] (488 kinetic {836045448940873}) <488>
[03/01/2012 14:23:53] [@Idrurrez] [Elite Tastybobble {846623953387520}] [Force Leap {812105301229568}] [RemoveEffect {836045448945478}: Immobilized {812105301229840}] ()
[03/01/2012 14:23:54] [Elite Tastybobble {846623953387520}] [@Idrurrez] [Melee Attack {813445331025920}] [ApplyEffect {836045448945477}: Damage {836045448945501}] (241 kinetic {836045448940873}) <241>
So there you go, once you spend some time reading through these logs, they get easier to decipher. There’s no doubt they’ll be invaluable for those guilds tackling challenging content and wanting to identify weaknesses in combat.
Beyond that though, is it something you’d use? Let us know in comments!

Heavy Damage is our weekly Tanking column – if you have suggestions of what you’d like covered, drop our resident Tank, Alec Bailey a line.
The Esseles is the first flashpoint you encounter after leaving your starting planet. Upon entering The Esseles you’ll meet Ambassador Assara in disguise as a common ship passenger – an Explosion rocks the ship and you rush off to see what can be done. The explosion was caused by the Imperials, demanding that Ambassador Assara be turned over. You refuse and this is where the fun begins.
As you leave the command deck heading for the docking bay, you’ll run into some standard and gold mobs, with a group of four they should be no trouble. As you arrive at your destination you find a Mon Cal issuing orders to a squad of Republic troopers, when the blast door is blown open and the first Boss of The Esseles comes running in. Lieutenant Isric is a level 10 boss and he spawns trash mobs that tend to attack the healer so be ready to burn them down. Isric has a cone AoE blaster attack and a knock down ability so be ready for it.
After your defeat of Isric you head back to the Command deck that has been captured by Mandalorian mercenaries. Their leader is known as Iron Fist and will be your second boss encounter. Before you can fight Iron Fist you must first unlock the blast door. To unlock the doors you are faced with the option of sacrificing the crew or taking the long road and manually resetting the reactors. This is your first Lightside or Darkside choice of the Flashpoint. Sacrificing the crew grants 150 Darkside points, and manually resetting the conduits, 150 Lightside points. Taking the Lightside option also grants you the chance to get a chest – it’s sitting behind the middle conduit.
After your decision with the engineering crew, you’re ready to fight Iron Fist. Like Isric, Iron Fist will spawn adds throughout the encounter. The best way to handle Iron Fist is to tank him, let your damage dealers burn the adds, and once the adds are down everyone gang up on Iron Fist. Iron Fist has three abilities that he’ll use during the fight: a Rocket Punch used as a gap closer, an AoE knock back, and Missile Salvo, which launches rockets onto a blue reticle (this can be avoided so try to keep an eye out for the reticle and move.)
The next boss is a large Guardian Battledroid named ISS-7. This fight is a very simple tank and spank although he will occasionally drop aggro and pick up a new target. Just watch for this and you’ll be fine. Immediately after your fight with ISS-7 you’ll have the opportunity to fight another boss if you hit the switches on either side of the room. The second boss in this area is much tougher, named ISS-994 Power Droid and he’s a force to be reckoned with. Starting out, he’s your standard Tank and Spank encounter, but he’ll use an ability that causes him to turn purple and crackle with lightning, so start kiting him. His damage is highly buffed during this phase, but his speed is lowered. He will do a lot of damage if he gets a hold of you, so watch what your doing when he has the damage buff up.
The final boss of The Esseles is a Sith named Vokk. Vokk is hard to tank because he’ll use Saber Throw and Force Choke on a random party member , both of which are unblockable. His third ability is Lightning Storm, and can be avoided by staying away from the purple reticle it leaves on the ground before activation. He also possesses an AoE knock back, so watch for that. Vokk is difficult because he has a lot of non-tankable damage, so this is a boss where you need a decent healer to pull off.
After Vokk’s defeat you’ll be faced with your second Lightside/Darkside choice – leaving Assara behind. If she’s left you’ll gain 100 Darkside points and if not 100 Lightside.
The Esseles is not a hard Flashpoint with a full group of level 10 players. I will be doing all the Flashpoints in order of level (at least the order I tanked them in), so if you have any input or suggestions about the Flashpoints, leave a comment and I’ll look into it!
As always Stay Frosty and may the Force be with you!
Aussie gamer Xterminatz has made three nifty little videos showing you how to solo (with your companion of course) the Level 50 Heroic quest Poisonous Strategy. Have a look for yourself:
Part 1:
Part 2:
Part 3:
 BioWare continue to trickle out their video Quick Start Guides, this time covering maps and navigation. These are very much aimed at new players, so don’t expect too many revelations. It covers the bases of current map functionality but it again highlighted for me the shortcomings of the current feature set – something we’ve covered before. I’m sure map improvements are on the development roadmap for SWTOR – there’s too many enhancements for there not to be work being done.
Watch the Quick Start Guide on maps for yourself here if you like – hopefully these guides will continue to expand and be a key part of the game’s initial learning curve.
BioWare have started to push out some tutorial videos to further flesh out their help / support offering. The first one is a brief look at logging in for the first time and creating your character. Being the cynical, world-weary SWTOR veteran I am, I initially thought this would be a pretty tedious video even for someone starting out with the game.
I’m here to say I actually learnt to things from the video – you can preview your character’s voice before choosing it, and you can lock individual facial elements before randomising others. I obviously rushed through the character creation screen!
Have a look for yourself:

This weeks it’s all about the Trooper Vanguard using the Shield Specialist tree. The Vanguard is a “ranged” tank according to Bioware, but in practice, it becomes very clear it’s a close range, almost melee tank. Now I’m not saying that the Vanguard isn’t capable of doing great damage or even pulling from range, only that once the conflict has begun you’re moving in close.
The Vanguard uses “Ammo” as its pacing mechanic. As with all classes you have abilities that cost, give, or are free of using your Ammo. From my experience with the Vanguard Tank, Ammo isn’t a hard resource to manage, easier than the Jedi Knight’s “Focus.” Also from my experience with the three Republic tanks, the Vanguard is VERY survivable, and one of the best tank classes I’ve played.
The Vanguard’s first companion is a DD or Damage Dealer. He’s also a Trooper, but specced as a Commando and he does excellent damage if equipped with some good gear. As with all Troopers, both the Vanguard and Commando use heavy armour, making Armormech a great crafting choice. Biochem is another great choice because you can craft reusable stims and Medpacks. Keeping your gear updated to your level is probably the most important thing you can do as a Vanguard, or any tank for that matter. Orange gear or “Artifact” gear is great for this, as you can just keep updating the armoring, mods, and enhancements, which you can do for nearly nothing if you save your commendations from each planet and use those to purchase your item mods – the same goes for weapons.
Now it’s time for some builds and some tactics – this is my build as the 30/11. Using my build you’ll lose out on your top tier ability in the Shield Specialist tree, but gain “Gut”, a Kinetic/Bleed damaging close range ability. A Shield Vanguards Primer is a great guide to tanking with a Vanguard created by SWTOR forum member Anoiktos. Anoiktos lays out terms and rotations for both the 30/11 build and the 31/whatever builds. Here’s Anoiktos’s advice on tanking single and multiple targets:
Single Target:
Open with Storm.
Stock Strike > High Impact Bolt > Energy Blast. (Assuming 31 shield. If you’re 30 shield/11 Tactics, ignore the energy blast.) If you have excess energy, Ion Pulse is your best bet.In addition to this, there’s a debuff priority list:
Static Field (Ion Pulse) > Gut DoT (Assuming 30/11. If not, ignore)Multiple Target:
Open with Mortar Strike (if available), or Storm -> Explosive Surge (if not).If any enemies are outside of easy AoE range, harpoon them now and on CD, prioritizing elites > strongs > weaks.
Now back up, and use Pulse Cannon (if up.) Otherwise mix Explosive Surge with stock strike and energy blast (if available) on CD, using hammer shot as filler and your taunt (Neural Jolt) to grab stray enemies. If you still have excess energy, try tab-gutting everything (if you have that skill) or adding more Explosive Surge to the mix.
Sticky Grenade can also be useful here, though I like to reserve it for its short hold on weak enemies that heal, and use it sparingly in AoE situations because its knockback makes subsequent AOE more difficult to pull off.
The debuff priority list is thus simple: Use Explosive Surge whenever the Static Field debuff is expiring.
Here’s a few builds that are worth a closer look:
Survival Tank – Submitted by Blackferne
Raid Tank – Submitted by darthuser3488
Here’s a couple variations of the 30/11 build set I spoke about above:
30/11 – Submitted by TyHalcyon
30/11 – Created by Yours Truly
Over to you: any tips you have on tanking as a Vanguard?

Recent Comments