Diplomatic Investigations: Jedi Sage Attack Rotations (Level 1-25)

Welcome to our weekly column dedicated to everything Consular and Inquisitor. If you have a suggestion for a topic you’d like covered in this column, drop us a line!

This week I want to talk a little about attack rotations for the Jedi Sage, and some tips for you to keep in mind.

Note that these rotations are covering the earlier levels for the Jedi Sage (up to level 25). In a future article I will discuss the higher level ones.

Firstly it’s important to know which attacks are instant casts, and which ones take time to cast.

It’s vital to have a handle on this so you are not wasting time casting at the wrong times. They say time is money. Well in SWTOR time you can save optimising your rotations can be the difference between life and death.

Generally I would recommend you put up your Force Armor first, as it protects you from damage until the shield is destroyed. Once you have done that, send in your companion to attack, and then while he/she is on the way, cast Mind Crush which has a 2 second timeframe to cast (before modifiers).

If you time this right, your Mind Crush will be hitting your enemy around the time your companion makes their first attack. Ideally you want the Mind crush to hit a fraction of a second after the companion hits to ensure the enemies first attack is at the companion and not you.

Mind crush does a moderate amount of damage but then more damage over 6 seconds (which is a long time in battle). What’s best is its casting range is 30m, allowing you to keep well away from the action. The cooldown of 9 seconds means you can often get to re-cast it during a battle for the more powerful foes you face. All Jedi Consulars get this ability at level 14 and I think it’s a very important one to add to your rotation.

Weaken Mind is a good one to cast next because it’s instant, does damage over time, has the same range as Mind crush but only requires half the force.

Another useful ability is Force Potency, which increases the force critical chance of your direct attacks (and heals!!) by 60% as well as increasing the range of Telekinetic Throw to 30 meters. This is a good ability to have up when you can (it lasts for 20 seconds and grants 2 charges, each time you critically hit or cast Telekinetic Throw you lose a charge), but it has 90 second cool down so you will probably only get to cast it once in a typical fight.

Project can be used as it’s an instant cast and you do not have to stand still while casting it. But relatively speaking the damage is low and the force cost high. In my rotations I typically use Project when the enemy is down to about 10% health and I am on my way to begin looting their corpse – yes I like to plan ahead!

If you are being attacked from multiple enemies (you or your companion), Force Wave is excellent since it’s a knock-back. It does a reasonable amount of damage and knocks back all enemies within 8 meters. Standard/weak enemies actually get knocked down for 3 seconds. This is useful if you or your companion are close to death and you want to either heal up or run away (get a bit of a head start).

Disturbance is a good ability as it has no cooldown and expends a moderate amount of Force. It does however have a cast time of 1.5 seconds. I typically use this after many of the other attacks have been used at least once.

The priority should be to keep your dots (damage over time) abilities up at all time. This requires a keen eye on screen to check when they are available to be re-cast.

This is one area that that nameless game starting with W had nailed – being able to create custom addons to easily see this information on screen – I hope Bioware allow us to create addons for the game at some point by releasing the necessary API information and tools.

I haven’t talked directly about healing this week, as I went into some detail about that last week. Suffice to say make sure you heal your companion and yourself (in that order) as needed.

The final ability I want to mention is Whirlwind as from what I can see many people overlook or do not use it at all.

This allows you to trap an enemy for about 60 seconds. Note that they heal rapidly while in the whirlwind, so it’s best use is at a start of a fight to take one enemy out of the fight until another (or many) enemies are eliminated. Otherwise you are effectively healing an enemy which may not be your intention!

Make sure the enemy you are proposing to use this ability on, is sufficiently out of range of any attacks on other players (area of effect, etc) because damage causes the effect to end immediately.

This is particularly important in Flashpoints and group fights, so make sure you make it clear to every party member which enemy is not to be attacked – you can use the tag ability to put a skill or other marker on the enemy in this situation. Normally I indicate at the start of the Flashpoint that a particular identifier (skull or whatever) is a do not attack, or a star is the enemy to be taken out first, etc.

I’ve even done this to players in PVP – it’s funny how long a player can stay stuck in a whirlwind in PVP – likely because everyone playing on the other side knows not to attack and while that player is caught in the whirlwind they are effectively outnumbering the opposition.

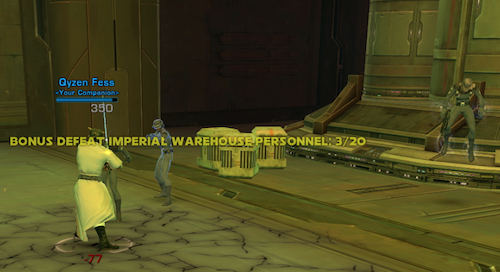
The image below shows the whirlwind in action. The guy on the right hand side is powerless while my companion and I attack the other two:

Well that’s me done for another week – let me know if you have any questions and I’ll be back same time, some bat-channel (website) next week!
Diplomatic Investigations: Jedi Sage and Sith Sorcerer Tactics

It’s with a great deal of pleasure we introduce Tim Buchalka to the TOROZ team. You can find out lots more about Tim here – but suffice it to say he’s a rather dedicated connoisseur of the Inquisitor and Consular classes, which will be the focus of this column. We’ve called it Diplomatic Investigations as both words are synonyms (sort-of) for the Consular and Inquisitor. Nerdy grammar humour indeed.  Anyway, please make Tim welcome and post your comments below!


Today I am going to focus on the Jedi Sage/Sith Sorcerer, which are the “other” lightsaber wielding classes in SWTOR. In case you are unaware, when you create a Jedi Consular or Sith Inquisitor character in SWTOR, at or around level 10 when you do your advanced training, you get the choice of  becoming a Jedi Sage/Sith Sorcerer or Jedi Shadow/Sith Assassin.

The Sage/Sorcerer classes are almost identical other than the fact one is Jedi and the other Sith – their skills and abilities are very similar (albeit it with different names) and the damage they do is also similar.

I’ll focus on the Shadow/Assassin in future articles but for now lets talk tactics for the Sage/Sorcerer.

Basic Attack Strategies

One of the biggest things to remember is that despite how cool the lightsaber looks, it does very little damage – I recommend you don’t use it.  Don’t worry, you will get to at least see it in your hand, you just don’t get to fight with it  🙂

It’s important to remember that these guys are not tanks, have light armour only, and are not melee characters.   Typically you will get best results sending your companion in to do all the “dirty work” with your enemies i.e. melee attacks;  leaving you to stand back (usually a long way back) and attack from a position of relative safety.

Incidentally, don’t be afraid to turn and run if your companion gets defeated.    You can always come back for another shot later – a Sage/Sorcerer hero fighting to the death without a companion usually becomes a dead hero very quickly!

My first character on SWTOR was an imperial agent Operative, which is very much a melee character.  After playing that for some time, when I swapped over to my Sage and Sorcerer (I am levelling both at present) it took a while for it to sink in that I should not be trying to get involved in melee. In fact, when I played my first Flashpoint (Black talon) I was asked why I was using my lightsaber in combat. After being asked, I actually took a look at the damage it was doing and it was very minimal compared to my other ranged attacks. I suggest you do the same, do away with the lightsaber in fights.

Stuns/Interrupts

One other important tactic is the use of stuns/interrupts and slow attacks during fights, especially with bosses. I’m talking here about the Mind Snap, Force Stun and Force Slow if you are a Jedi Sage or Jolt, Electrocute or Shock attacks if you are a Sith Sorcerer.

You may not have noticed but the harder to kill elite characters and bosses often have special attacks that usually do significantly more damage than their regular ones. If you can prevent these attacks altogether (or interrupt them if they have already started) it can spare you or your companion a significant amount of damage. This is even more important in flashpoints when every enemy is that much harder to defeat.

Watch for the blue bar on screen (below the red health indicator on your enemy).  If you see a blue bar moving from left to right it means a special attack is being charged – now is the time to issue a Mind Snap or a Jolt. Do that before the blue bar gets to the right hand side and it means you have prevented the attack from starting (also stopping the enemy from using that attack for 4 seconds). If it has already been cast you may see a blue bar moving from right to left (if it’s a damage over time attack).  Your interrupt will stop it dead in its tracks, meaning the rest of the damage is not inflicted.

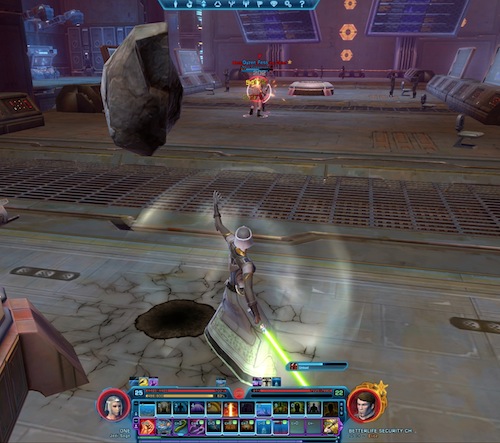
See the image below of my Sage attacking a Betterlife Security Chief where he has already used his special attack (you can see the blue bar just above my companions).  It also serves as a reference of how far I suggest you stand away from the main fight.  No need to be any closer than absolutely necessary.

Likewise, stuns and slows do what they suggest they will – they can stun an enemy (preventing them from moving or attacking) or slow their speed down, allowing you (and your companion) to get some extra attacks in while it is in force. Most of these attacks have a cooldown before they can be reissued (for example Jolt/Mind Snap is 12 seconds) so in a big fight be sure to check when you can re-issue it. I’ve used this tactic in big battles with good effect.

Healing

I used to think this was a given but I have done a lot of flashpoints and teamed up with other Sage or Sorcerer players and I see them often not healing their companions. They just let their companion fight to the death and don’t attempt to heal them.  As a result they cannot handle the bigger fights easily or they can get overwhelmed if larger numbers of the enemy are involved.

The thing to remember with the Sage and the Sorcerer is that it’s the companion taking all the damage (Qyzen Fess if you’re a Sage or Khem Val if you are a Sorcerer).  These companions are good at holding aggro, ensuring the enemies keep attacking them rather than you. As a result it makes sense to heal them when their health is starting to get low, because if they are defeated guess who is going to be attacked next? I typically monitor the health of my companion during fights and when his health has dropped to around 25 percent or less, I stop attacking and focus on healing him.

With a boss fight I usually start healing when the health has dropped 40-50 percent since Bosses tend to do more damage and the more powerful healing spells take a while to cast.  The last thing you want to do is stop attacking to heal your character but find you have left it too late and he is defeated while you are still casting.  Not only have you lost the companion, but you have also not been inflicting any damage while you have been trying to heal. It can be a little unnerving focusing on healing when your companion is in a fight with 2-3 enemies and your natural instincts are to fight, but the thing to remember is, if your companion is alive its likely you are too! It can take a while to get the timing right but it’s an important skill to learn and will really help you in the tougher fights.


And as mentioned early, because you are a long way from the action (well out of melee range) – if it appears you cannot save your companion and looks unlikely that you are going to win, turn around, cast Force Speed and get out of there fast!

Companions Weapons and Armour

You should be continually upgrading your companion’s armour and weapons.  This ensures that they can inflict and absorb a lot of damage.  It also increases the threat level of your companion making it more likely he will be attacked and not you. It’s not uncommon in a big fight to find an enemy who is attacking you suddenly turn and race to attack your companion.  Some of this is because they have good armour and weapons, but also Qyzen and Khem Val both have good AOE (Area of Effect taunts) which they will use to ensure enemies attack them and not you. As a worse case scenario you can cast something like a Cloud Mind, which reduces your threat level, but I almost never need to use this.

Remember the Force Armor/ Static Barrier

A cool defence against damage is Force Armor (Jedi Sage) and Static Barrier (Sith Sorcerer).  This protects you from a high amount of damage for 20 seconds but also has a 20 second cool down. My rotation before attacking usually consists of casting this first, then instructing my companion to begin an attack, followed by casting a ranged attack with a long activation time like the Jedi Sage’s Mind Crush. That way, in most fights my companion has reached the enemy as my first ranged attack hits them, my shields (Force Armor or Static Barrier) are up, and I am in the position to start my attack with instant ranged attacks.


So there you go.   These are pretty basic tips I know, but I have found them to be quite valuable and they collectively helped me get out of some tricky situations, sometimes when the odds are stacked against me.

I hope you enjoyed this article.  I’ll be back next week with more Consular and Inquisitor tips.  If there is anything specific you would like me to cover, or have any comments feel free to leave your thoughts below, I would love to hear from you!


Yay! Wizard is out!

Wow. What an update a week or so back. Bioware seems to be really making sure that fans of The Old Republic are salivating. Well, first of all, they renamed Jedi Wizard. It’s about freaking time! Of all the choices they had, Jedi Sage was probably the best, but most of us knew that already, right? But then, the crew skills explanation… Whoa… I can see a whole bunch of people’s eyes going huge at that.

The advanced Jedi Consular class name of Jedi Wizard was apparently a placeholder title. Personally, I doubt that it was a serious name. I mean it, come on, this is Star Wars, not Dungeons and Dragons! The Sith may have Sorcerers, but that is what they are- Sorcerers. They use Sith alchemy and Sith magic, or at least they do in the Expanded Universe. Jedi are not, and never have been the wizard type. They have been called that on occasion, but it was almost always an insult.  Yes, they have mystical powers like wizards. But where wizards usually seek power for their own ends, be those ends noble or selfish, the Jedi do not seek power for themselves. And the name Jedi Sage is much more suited to a consular type anyway. A consular is supposed to be a teacher, negotiator, diplomat, truth seeker, not some half crazy man or woman in a pointed hat with stars all over his/her robe. We don’t need fireball spells in Star Wars. We have orbital fire support for things like that. I was pretty sure that the name Jedi Wizard was going to vanish and it did.

So, the new explanation of class skills. All I can say is wow. I like it. And there was a neat little thing hidden in there. Weapon types -“blaster pistols, blaster rifles, sniper rifles, and assault cannons”. Whu…? Wait a sec… Assault cannons? We get ASSAULT CANNONS? I want one! Is that the really big gun that the trooper that Malgus pulled to him was carrying in the Hope Trailer? If so, I really want one!

So, Armstech. The crew skill that will allow characters to build weapons. Speaking from personal, real world, experience, nothing else comes close to building your own weapon. Nothing else feels quite right in my hands now, besides the sword that I built. Admittedly, I built it from pre-built parts that I got from various sources, but I assembled it. No, I cannot forge a katana blade myself. Oh how I wish… That sword is mine. Every other blade I have handled, even a three hundred year old blade that my sensei let me handle once, has paled in comparison. So it just makes sense to have people build their own weapons, even if they are not the crafting sort normally. So I can build my assault cannon.

Ah, the memories. I remember pre-CU Star Wars Galaxies where the greatest of the artisans could basically demand any price for their wares, because they were simply better than anything else out there. The demands for resources were never ending. I remember being sent out to Dathomir and getting ganked there again and again just to gather rare resources for the guild I was in, so our weaponsmith could make the best polearms/swords/scythes, etc. In The Old Republic, you can just send a minion/slave/friend. But wait, there is a catch…

Do your companions like you? We don’t know if this is going to be like the approval rating in Dragon Age: Origins. We all loved slapping Morrigan around, didn’t we? I know I did. It does make sense.  A companion who likes you will work harder for you than one who is there because he or she is a slave or whatever. This is simple work theory. Happy worker = more productive worker, usually anyway. Make your workers love you (or fear you) and they will move mountains for you. Hey, it worked for the Pharaohs. The addition of rare and artifact crating ingredients will likely keep many players playing just to get some of those. I don’t know about you, but I will. I want an artifact assault cannon. Did I say that enough? I want an assault cannon!

Anyway, The Old Republic is shaping up to be a great game. Bioware has apparently learned from the mistakes of many other games, both recent and not. The crew skills and crafting seem to be well thought out and efficient. The whole system seems to be geared both to casual players and the hardcore, ‘I want it all and the best I can get’ player. People who like to build will be able to build. Those of us who like to just go out and blow things up will be able to do that and leave our faithful minions to sweat over the workbench while we are out blowing things up. With assault cannons!

In conclusion, this week’s update was a good one. Jedi Wizard is GONE and good riddance. Armstech looks well thought out and accessible even to casual gamers, which was the idea. You don’t HAVE to spend 8 hours a day playing just to get that fat loot to craft the flux capacitor to attach to your gun to make it good. Although you likely will be able to play that much if you wish, and I likely will be playing at LEAST that long a day for the first couple. I really want an assault cannon now. Have I said that enough? Give me an assault cannon! When in doubt, get a bigger gun!