Diplomatic Investigations: Melee or Ranged – What’s Your Poison?

Welcome to our weekly column dedicated to everything Consular and Inquisitor. If you have a suggestion for a topic you’d like covered in this column, drop Tim a line!

Both the Sith Inquisitor and Jedi Consular offer you the choice of a melee character or a ranged one. The melee classes are close up action where you are fighting alongside your companion or other players in a group, whereas the ranged characters fight from a distance.

The Sith Assassin is the Melee character, and the Sith Sorcerer is the ranged class.  For the Republic side the Jedi Shadow is the Melee class and the Jedi Sage the ranged one. The classes on opposing sides are very similar in their abilities (albeit it with different names) so after a period of familiarisation either should feel comfortable to you.

So how do you make the decision on which way to go?

Firstly from a faction viewpoint, you will likely have an opinion on which side you will want to start playing – I rushed to create a Sith Inquisitor for the “dark side” experience (although of course you can make “dark side decisions” as a republic player) and then moved to the Sith Sorcerer because I like the ranged attacks more than melee.

Another decision which can play a factor in melee vs ranged is server location. Aussie SWTOR players in general have until recently suffered a disadvantage compared to their overseas opponents, mostly due to our physical location. Most SWTOR servers reside in other countries and as the game has to send and receive information to and from the servers you can see that in theory the further away you are from the action the more you could suffer a disadvantage.   Even though the time is measured in milliseconds these differences count.

SWTOR does a good job generally of trying to even things up to a degree, but with PVP in particular things can get very hectic.  Play SWTOR for any period of time and you will hear about lag. This becomes an issue because every single key-press or mouse-click has to be transmitted.  And of course information on your surrounding areas (opposing players movements, NPCs, and anything else that moves or does something) has to be updated. The reality is if other players reside in the same country as the server, then it takes much less time for their key-press or mouse click to be sent and received as well as the other game state updates. We are still talking milliseconds here, but in a PVP situation milliseconds can count. Depending on the lag you might find the opposing player has time to issue several commands to your single one – And from their point of view, you seem to be very “slow” and  easy to defeat as a result and he/she seems almost invulnerable because every time you go to attack he/she beats you to the punch.

The reason the melee vs ranged decision is a problem on overseas servers is how the classes operate.  The up- close melee classes can suffer more with lag in my experience than ranged classes.  One example is a “from behind” attack (Jedi Shadow and Sith Assassin).  If you have lag issues it’s going to be harder as a rule to position yourself quickly as it’s more about co-ordinating movements and attacks at the right time versus just issuing attacks as a ranged class.

So yes we Aussies and New Zealanders have a good excuse of why we are not good at PVP.  Well maybe not!  While there is not doubt lag plays a part a good player can work within these limits. In any event, the good news is that all of this has changed with the recent introduction of local servers in Australia.

So when it’s available, make sure you move your characters to the Australian servers to eliminate this lag problem, because most of the players on these servers will be Aussies meaning that lag should generally be a non-event.  And if we find some overseas players on the servers then it’s our chance to use their lag to our advantage.  I’ve already had some interesting discussions with some overseas players complaining about the lag on Aussie servers  🙂

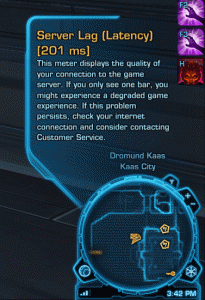
Out of interest you can hover your mouse in game over the latency button to get a general idea of your speed.  Also known as your ping.  As you can see in the two pictures, I have shown you my ping on an American server and an Aussie server . As you can see with the exact same Internet connection the American server has about four or fives times high latency than the Aussie server.  This can make a big difference.


Nasty, evil overseas lag

Ahh, that's more like it


In case you are wondering, I am with Bigpond Cable on their Ultimate package and loving the 33 ms latency. I moved there because it is the fastest possible Internet access in my area.  Add local servers to the mix and I am in heaven!

With lag being taken out of the equation, other factors in deciding which advanced class apart from the melee or ranged questions are, whether you wish to focus on healing, whether you like the benefits of invisibility, if you want to be a tank in game, to name three common ones.

Make sure you choose carefully though because once you choose between melee and ranged, it can never be changed for that character.  That said, the thing to remember is that you only need to level up a character to around level 10 and leaving your first planet, to get access to the advanced classes. So there is nothing stopping you from leveling up a few characters and trying both sides before deciding where to put your focus in the long term.

Thanks for reading and I’ll be back next week!
 

Heavy Damage: Tanking Athiss

Heavy Damage is our weekly Tanking column – if you have suggestions of what you’d like covered, drop our resident Tank, Alec Bailey a line.

Time for Part Three of my Flashpoint saga – this time covering The Athiss.

The Athiss is recommended for level 21 players and is open to both the Republic and Empire. The Flashpoint begins on the planet’s surface at a small shuttle. As you move you’ll encounter several droids and a console for a lift that will take you to the next stage of the map, but the console requires a Slicing skill of 80 to use. If the console cannot be accessed by your party, you will have to jump down the shaft (the party will suffer moderate damage). If a Scavenger is present in the party, you’ll be able to activate a droid to help with combat.

The first boss in this Flashpoint is Professor Ley’arsha, the second is The Beast of Vodal Kressh, and the final boss is The Prophet of Vodal. Along with those bosses, this Flashpoint contains several Temple Guardians and Temple Disciples, These are champion level mobs spread throughout the temple after the second boss on the way to the third. Alone, these mobs aren’t hard to handle, but if a stray or wandering one is aggroed (especially if it’s a combo of Disciple and Guardian) they turn into a different beast, and are quite hard to handle.

Bosses

Professor Ley’arsha

The Professor is a pretty easy boss – she has three abilities she uses. A frontal cone attack, easily countered by facing her away from the group (this should be standard practice for every Tank when in action). Her second ability is an AoE, indicated by a large purple reticule easily avoidable by just moving out of the way. Her third ability is adds, which usually charge for the healer so let the DPS burn them down while you maintain aggro on the Professor.

The Beast of Vodal Kressh 

The Beast is a very traditional spank and tank. The Beast has two abilities. The first is a frontal knock back ability – this can be countered by standing close to the temple entrance against the wall. Have the DPS and Healer stand to the back and do their thing. The knockback is dangerous because it can knock you off the ledge on the left side of the boss and possibly out of healing range. The Beast’s second ability is adds that periodically spawn and should be burned down by the DPS. The Beast itself doesn’t do a lot of damage but has a ton of health and is more difficult than the Professor.

The Prophet of Vodal

The Prophet will be the most difficult boss you have fought yet. He has a large health pool( 60k) and he also has several abilities and fight mechanics that make him even more dangerous. Every time the party takes 20 percent of the Prophet’s health he will vanish and mark a random player with Soul Rend debuff. After the prophet has vanished  four flames will appear and attack whoever has the debuff. The flames cannot be killed but they will disappear after several seconds, so whoever has the debuff just kite the flames till they dissapear. They are VERY dangerous and even though they target a random player in the three or four times I’ve ran this I haven’t been targeted yet. Although I have no evidence for this theory I believe it has something to do with your Armor rating.

The Prophet’s second ability triggers every 15 seconds and is a DoT (Damage over Time) ability called Crushing Affliction that is cast on a random player in the party. Crushing affliction does severe damage every five seconds and when it ends it detonates for AoE damage. Crushing Affliction should be healed through if you don’t have someone who can dispel in your party – the easiest way to see who has the DoT is a green debuff icon on the party frames. The Prophet is such a hard boss because of all the non-Tankable damage. This fight requires a healer who can think on their feet and know what they are doing.

As always, stay frosty and may the Force be with you.

Cunning Ambitions: Gunslingers as Team Players

It’s with enormous pleasure we introduce another new column at TOROZ. Cunning Ambitions is dedicated to everything Smuggler and Imperial Agent. It’s a double pleasure introducing this column, as its writer, Kate DiBella, has broken the drought of female writers. Welcome Kate!

Hello everyone, and welcome to the first instalment of Cunning Ambitions – your resource for all that’s Smuggler/Imperial Agent!

According to the most recent stats, Smugglers and Agents are the least popular classes in SWTOR. Of those that do exist I’d be willing to bet that a good majority are alts, and not the main characters of their players. The reasons for this are many and varied, but hopefully I can try to enroll a few more to our sparse ranks through this column. With the launch of SWTOR locally only a week ago, many of you may even see the smuggler as a good class to try out, at least until those much-delayed server transfers come through. 😉

Today, I’m going to talk about a specific Smuggler advanced class: the Gunslinger.

Solo vs. Party Gunslinger

Playing solo as a Gunslinger is great fun, and really suits the ‘feel’ of the character – the lone ranger on a quest for glory and riches, that they’d rather not have to share.  Armed with twin blasters, medium-weight armour, a superior attitude and a trusty agro-magnet companion, you can take on just about anything level-appropriate out in the main universe.   However, to fully experience all that SWTOR has to offer, you’re going to need to team up with other players to take on most of the Heroics, Flashpoints, and Operations (henceforth referred to as “group quests”, for brevity’s sake).

Playing in a team requires a very different mentality to playing solo for the Gunslinger.  Where before, you might have thrown in Thermal Grenades and Sweeping Gunfire throughout the battle (I certainly do, especially the grenades :D), you now have to be a lot more careful about what you hit, and when.

There’s no ‘I’ in Team

The number one consideration (and this is not restricted to Gunslingers) is communication. It is absolutely essential that you establish the roles of everyone in the group before you embark upon the meaty parts of the quest.  You need to decide who is tanking, who is healing, and who will be dealing the damage (DPS). As a gunslinger, you are primarily ranged-DPS, though you can also act as an off-tank (more on that later) in emergencies.

Also important to determine at this stage, is who has what Crowd Control (CC) abilities.  Yours is Slice Droid, and as the name suggests, it only works on droids.  Like all CC abilities, it will incapacitate one enemy for 60 seconds; any damage (splash or direct) will cause it to end early.  Not all group quests feature enemy droids, but there are enough that this can be quite handy.

Once roles are determined, it’s time to get started.  While things may vary dependant upon the classes present in the group and the preferences of each player, there is typically a common sequence I like to follow:

(This strategy assumes that a healer, a tank, a melee DPS and myself make up the group)

– I position myself at a distance where Thermal Grenade and Vital Shot become lit up in my shortcut bar, preferably behind natural cover, but otherwise my Cover Screen will do.

– Usually, those with relevant CCs will pick their targets (ones near the edges are best; ones that are pre-determined and marked are even better) and start using them.

– While those are warming up, the tank will run/leap to the strongest remaining target and use their aggro-pulling moves to get the attacks hitting them.

– As soon as those two things happen, I send a Vital Shot at whatever is attacking the tank directly, then switch to start wailing on the weaker and ranged enemies.

– As soon as they are dropped, I focus on whatever the melee DPS is fighting, then take out the CC’d enemies.

– Rinse. Repeat.

In a group like this, it should be the ranged DPS’ job to get rid of as many of the weaker/ranged opponents as quickly as possible.  Often, when ranged enemies are involved, this can mean that the Gunslinger will draw their fire away from the tank.  Don’t panic!  This is what you’re made for.  Remember how I mentioned off-tanking?  Well, you’ve got a host of tricks up those sneaky, smuggling sleeves.

Early on in the game, Ballistic Dampers will be your greatest defence.  These give you 3 enemy poundings that cause 30% less damage, and they’re triggered by entering cover.  Keep an eye on the amount you have left, and where possible exit-and-re-enter cover to reset them when you run out.  Dodge, Defense Screen and Hunker Down can also protect you should you happen to draw the fire of something beyond what you can handle. If this happens, and the tank is still alive, the best and funniest (I think) skill in the game, Surrender, can be used.  This is exactly what you see Smuggler-trainers doing in town – when they throw up their hands and coins go scattering everywhere.  It drops your threat, and should hopefully send the unwanted enemy back at the tank.

If not…it’s Dirty Kick and Blaster Whip time; and a prayer to the gods of Smuggling might not hurt, either!

This is one type of strategy out of many that I’m sure exist, but it’s an example of a few of the useful things a ‘slinger can do as part of a team.

Top Tips

  • Communication, communication, communication!  Seriously, I can’t stress this enough, especially once you hit level 30. You can’t just rush blindly into most party areas like a bull out of a gate, or your whole group will be slaughtered.
  • Your Skill tree will have a lot to do with your success, even though it may not seem like it does early on.  For DPS, you’ll want to mostly stack points into Sharpshooter especially Cover Screen, Steady Shots and Ballistic Dampers (don’t bother with Percussive Shot, Sharp Aim, and Trip Shot), a few points can go into Streetwise skills, and you really only need Black Market Mods and No Holds Barred from Dirty Fighting (though Mortal Wound and Open Wound could be of use, if you have the points to spare and use Vital Shot a lot).
  • The ideal cover is natural (whether rock/crate/etc.) but the cover mechanics can be finicky until you are used to them.  The best thing you can do is to set ‘Take Cover in Place’ to something more useful than the default of Shift+F  (I reversed the bindings for take cover and take cover in place, they are found in Preferences>Key Bindings>Targeting).  If you have time to set up before a big fight, roll to a decent natural cover position, then take a step back.  Enter ‘take cover in place’, which will bring up your cover screen, now you have the added protection of natural cover, with the bonuses of your cover screen (you did invest in those Ballistic Dampers, right?).
  • Keep an eye on your Energy.  Below 60, it is slower to recover, so try to space out your energy-using skills early in a fight with regular bouts of ‘Flurry of Bolts’.
  • Always upgrade to weapons, mods and armour that improve: 1. Armour, 2. Cunning and 3. Endurance.
  •  Keep an eye on your healer; if they die, everyone dies.  If you see them coming under fire, start attacking whatever is hitting them and draw the fire onto yourself.  It’s easier for a healer to worry about healing you and the tank, than having to also try to protect themselves in the mix.
  • Thermal Grenades and other Area of Effect (AoE) attacks, fun as they are, have no place in most group quests.  They usually end up drawing far too much aggression from the enemies, and can drop crowd control abilities early.  Save them for the end of a battle, or for soloing.

Most of the above I have found through my own research, gameplay and trial and error.  I do not yet have a level 50 Gunslinger, and am in no hurry to get there (fun is in the journey, not the destination, after all).  However, I do hope I can be of some help, especially to those new to the class, or a little unsure how to play them.  I had very little help when I began, and even something as simple as explaining what on earth a CC was and how it affected me would have been great.

Feel free to comment if you have any questions, comments, or constructive criticism about what I’ve said.  Also, please let me know if there’s anything you want me to cover in the future, I’ll try to do my best to accommodate.

Thanks for reading, and stay sneaky! 😉

Diplomatic Investigations: Jedi Sage Attack Rotations (Level 1-25)

Welcome to our weekly column dedicated to everything Consular and Inquisitor. If you have a suggestion for a topic you’d like covered in this column, drop us a line!

This week I want to talk a little about attack rotations for the Jedi Sage, and some tips for you to keep in mind.

Note that these rotations are covering the earlier levels for the Jedi Sage (up to level 25). In a future article I will discuss the higher level ones.

Firstly it’s important to know which attacks are instant casts, and which ones take time to cast.

It’s vital to have a handle on this so you are not wasting time casting at the wrong times. They say time is money. Well in SWTOR time you can save optimising your rotations can be the difference between life and death.

Generally I would recommend you put up your Force Armor first, as it protects you from damage until the shield is destroyed. Once you have done that, send in your companion to attack, and then while he/she is on the way, cast Mind Crush which has a 2 second timeframe to cast (before modifiers).

If you time this right, your Mind Crush will be hitting your enemy around the time your companion makes their first attack. Ideally you want the Mind crush to hit a fraction of a second after the companion hits to ensure the enemies first attack is at the companion and not you.

Mind crush does a moderate amount of damage but then more damage over 6 seconds (which is a long time in battle). What’s best is its casting range is 30m, allowing you to keep well away from the action. The cooldown of 9 seconds means you can often get to re-cast it during a battle for the more powerful foes you face. All Jedi Consulars get this ability at level 14 and I think it’s a very important one to add to your rotation.

Weaken Mind is a good one to cast next because it’s instant, does damage over time, has the same range as Mind crush but only requires half the force.

Another useful ability is Force Potency, which increases the force critical chance of your direct attacks (and heals!!) by 60% as well as increasing the range of Telekinetic Throw to 30 meters. This is a good ability to have up when you can (it lasts for 20 seconds and grants 2 charges, each time you critically hit or cast Telekinetic Throw you lose a charge), but it has 90 second cool down so you will probably only get to cast it once in a typical fight.

Project can be used as it’s an instant cast and you do not have to stand still while casting it. But relatively speaking the damage is low and the force cost high. In my rotations I typically use Project when the enemy is down to about 10% health and I am on my way to begin looting their corpse – yes I like to plan ahead!

If you are being attacked from multiple enemies (you or your companion), Force Wave is excellent since it’s a knock-back. It does a reasonable amount of damage and knocks back all enemies within 8 meters. Standard/weak enemies actually get knocked down for 3 seconds. This is useful if you or your companion are close to death and you want to either heal up or run away (get a bit of a head start).

Disturbance is a good ability as it has no cooldown and expends a moderate amount of Force. It does however have a cast time of 1.5 seconds. I typically use this after many of the other attacks have been used at least once.

The priority should be to keep your dots (damage over time) abilities up at all time. This requires a keen eye on screen to check when they are available to be re-cast.

This is one area that that nameless game starting with W had nailed – being able to create custom addons to easily see this information on screen – I hope Bioware allow us to create addons for the game at some point by releasing the necessary API information and tools.

I haven’t talked directly about healing this week, as I went into some detail about that last week. Suffice to say make sure you heal your companion and yourself (in that order) as needed.

The final ability I want to mention is Whirlwind as from what I can see many people overlook or do not use it at all.

This allows you to trap an enemy for about 60 seconds. Note that they heal rapidly while in the whirlwind, so it’s best use is at a start of a fight to take one enemy out of the fight until another (or many) enemies are eliminated. Otherwise you are effectively healing an enemy which may not be your intention!

Make sure the enemy you are proposing to use this ability on, is sufficiently out of range of any attacks on other players (area of effect, etc) because damage causes the effect to end immediately.

This is particularly important in Flashpoints and group fights, so make sure you make it clear to every party member which enemy is not to be attacked – you can use the tag ability to put a skill or other marker on the enemy in this situation. Normally I indicate at the start of the Flashpoint that a particular identifier (skull or whatever) is a do not attack, or a star is the enemy to be taken out first, etc.

I’ve even done this to players in PVP – it’s funny how long a player can stay stuck in a whirlwind in PVP – likely because everyone playing on the other side knows not to attack and while that player is caught in the whirlwind they are effectively outnumbering the opposition.

The image below shows the whirlwind in action. The guy on the right hand side is powerless while my companion and I attack the other two:

Well that’s me done for another week – let me know if you have any questions and I’ll be back same time, some bat-channel (website) next week!

Heavy Damage: Tanking Hammer Station

Heavy Damage is our weekly Tanking column – if you have suggestions of what you’d like covered, drop our resident Tank, Alec Bailey a line.

This week I will tell you how to keep you and your team alive while on Hammer Station. My guides may be focused on tanks, but it doesn’t hurt for you healers and damage dealers to take a look at what your tank has to handle.

Hammer Station is suggested for Level 16 players. A full group is needed until about level 22 or so when two people can run it with companions. Hammer Station is available to both Empire and Republic players.

Areas

Expansion Excavation

The Flashpoint starts out in the Expansion Excavation area.  The boss for this area of the map is a very large droid named DN-314 Tunneler. In this area if you or one of your teammates have a high enough slicing skill, you can activate a drill about halfway through the area to bypass some trash mobs and head straight to the boss fight. The drill is located in a dead-end room about halfway through the Expansion Excavation area. After the boss battle with DN-314, the group will be given a Lightside/Darkside option, and the choice will determine how you proceed to the second area, the Security Wing.

Security Wing

After your Darkside/Lightside choice you will enter the Security Wing area. The boss in the Security Wing is Vorgan the Volcano, Vorgan is accompanied by two adds, Sawbone (Heals) and Torch (Damage).

After the boss battle you’ll come to a bridge – when you encounter this bridge remember that Blue is good and Red is bad. If you try to cross while the bridge is red you’ll fall to your death, so wait for the colour change – it doesn’t stay blue long so don’t linger.

Section Zero

In Section Zero you will encounter your final boss, Battlelord Kreshan who is accompanied by 3-4 enemies summoned throughout the fight.

Bosses

DN-314 Tunneler

The best plan of attack on this boss is damage – kill the Tunneler as fast as possible. DN-314 will periodically spawn floating droids that explode when in proximity of a player. AoE attacks can cause them to explode out of their damage radius. If the group had a splicer and your group took the alternate route, your healer and ranged dps (if available) can stand on some crates to help avoid the adds damage. DN-314’s second ability is a laser beam that targets a random player in the party – make sure the healer is switching between the targeted players as the laser beam does quite a bit of damage. If using the second strategy, make sure you stay within range of heals while tanking DN-314.

Vorgan the Volcano

Set markers on the three enemies in front of you: Sawbones, Torch, and Vorgan. That order should be your kill order. If you can kill both the lieutenants simultaneously, then that’s also a great strategy – just make sure you don’t lose Vorgan’s Aggro.

Battlelord Kreshan

Kreshan is the final and most difficult boss, fielding four abilities.

Frontal Blaster Spray – A cone AoE attack that is actually easily avoided if while tanking you keep his back to your party.

Bomb – this is also avoidable as it’s marked by a large red reticule on the ground. Move out of it and suffer no damage.

Knockback –  Knockback is more dangerous to Tanks than anyone else. If you don’t watch where you are standing, it can knock you off the platform to your death. Keep Kreashan in the middle of the room facing away from your healer and you’ll be fine.

Adds – Kreshan also calls upon adds periodically,  the best plan of attack is to bunch up and AoE / burn down the adds.


This has been a guide to Hammer Station for tanks, by a Tank.( Healers and Damage Dealers are welcome to its wisdom too!)

As Always Stay Frosty and May the Force be with you!

Heavy Damage: Tanking The Esseles

Heavy Damage is our weekly Tanking column – if you have suggestions of what you’d like covered, drop our resident Tank, Alec Bailey a line.

The Esseles is the first flashpoint you encounter after leaving your starting planet. Upon entering The Esseles you’ll meet Ambassador Assara in disguise as a common ship passenger – an Explosion rocks the ship and you rush off to see what can be done. The explosion was caused by the Imperials, demanding that Ambassador Assara be turned over. You refuse and this is where the fun begins.

As you leave the command deck heading for the docking bay, you’ll run into some standard and gold mobs, with a group of four they should be no trouble. As you arrive at your destination you find a Mon Cal issuing orders to a squad of Republic troopers, when the blast door is blown open and the first Boss of The Esseles comes running in. Lieutenant Isric is a level 10 boss and he spawns trash mobs that tend to attack the healer so be ready to burn them down. Isric has a cone AoE blaster attack and a knock down ability so be ready for it.

After your defeat of Isric you head back to the Command deck that has been captured by Mandalorian mercenaries. Their leader is known as Iron Fist and will be your second boss encounter. Before you can fight Iron Fist you must first unlock the blast door. To unlock the doors you are faced with the option of sacrificing the crew or taking the long road and manually resetting the reactors.  This is your first Lightside or Darkside choice of the Flashpoint. Sacrificing the crew grants 150 Darkside points, and manually resetting the conduits, 150 Lightside points. Taking the Lightside option also grants you the chance to get a chest – it’s sitting behind the middle conduit.

After your decision with the engineering crew, you’re ready to fight Iron Fist. Like Isric, Iron Fist will spawn adds throughout the encounter. The best way to handle Iron Fist is to tank him, let your damage dealers burn the adds, and once the adds are down everyone gang up on Iron Fist. Iron Fist has three abilities that he’ll use during the fight: a Rocket Punch used as a gap closer, an AoE knock back, and Missile Salvo, which launches rockets onto a blue reticle (this can be avoided so try to keep an eye out for the reticle and move.)

The next boss is a large Guardian Battledroid named ISS-7. This fight is a very simple tank and spank although he will occasionally drop aggro and pick up a new target. Just watch for this and you’ll be fine. Immediately after your fight with ISS-7 you’ll have the opportunity to fight another boss if you hit the switches on either side of the room. The second boss in this area is much tougher, named ISS-994 Power Droid and he’s a force to be reckoned with. Starting out, he’s your standard Tank and Spank encounter, but he’ll use an ability that causes him to turn purple and crackle with lightning, so start kiting him. His damage is highly buffed during this phase, but his speed is lowered. He will do a lot of damage if he gets a hold of you, so watch what your doing when he has the damage buff up.

The final boss of The Esseles is a Sith named Vokk. Vokk is hard to tank because he’ll use Saber Throw and Force Choke on a random party member , both of which are unblockable. His third ability is Lightning Storm, and can be avoided by staying away from the purple reticle it leaves on the ground before activation. He also possesses an AoE knock back, so watch for that. Vokk is difficult because he has a lot of non-tankable damage, so this is a boss where you need a decent healer to pull off.

After Vokk’s defeat you’ll be faced with your second Lightside/Darkside choice – leaving Assara behind. If she’s left you’ll gain 100 Darkside points and if not 100 Lightside.

The Esseles is not a hard Flashpoint with a full group of level 10 players. I will be doing all the Flashpoints in order of level (at least the order I tanked them in),  so if you have any input or suggestions about the Flashpoints, leave a comment and I’ll look into it!

As always Stay Frosty and may the Force be with you!

Diplomatic Investigations: Jedi Sage and Sith Sorcerer Tactics

It’s with a great deal of pleasure we introduce Tim Buchalka to the TOROZ team. You can find out lots more about Tim here – but suffice it to say he’s a rather dedicated connoisseur of the Inquisitor and Consular classes, which will be the focus of this column. We’ve called it Diplomatic Investigations as both words are synonyms (sort-of) for the Consular and Inquisitor. Nerdy grammar humour indeed.  Anyway, please make Tim welcome and post your comments below!


Today I am going to focus on the Jedi Sage/Sith Sorcerer, which are the “other” lightsaber wielding classes in SWTOR. In case you are unaware, when you create a Jedi Consular or Sith Inquisitor character in SWTOR, at or around level 10 when you do your advanced training, you get the choice of  becoming a Jedi Sage/Sith Sorcerer or Jedi Shadow/Sith Assassin.

The Sage/Sorcerer classes are almost identical other than the fact one is Jedi and the other Sith – their skills and abilities are very similar (albeit it with different names) and the damage they do is also similar.

I’ll focus on the Shadow/Assassin in future articles but for now lets talk tactics for the Sage/Sorcerer.

Basic Attack Strategies

One of the biggest things to remember is that despite how cool the lightsaber looks, it does very little damage – I recommend you don’t use it.  Don’t worry, you will get to at least see it in your hand, you just don’t get to fight with it  🙂

It’s important to remember that these guys are not tanks, have light armour only, and are not melee characters.   Typically you will get best results sending your companion in to do all the “dirty work” with your enemies i.e. melee attacks;  leaving you to stand back (usually a long way back) and attack from a position of relative safety.

Incidentally, don’t be afraid to turn and run if your companion gets defeated.    You can always come back for another shot later – a Sage/Sorcerer hero fighting to the death without a companion usually becomes a dead hero very quickly!

My first character on SWTOR was an imperial agent Operative, which is very much a melee character.  After playing that for some time, when I swapped over to my Sage and Sorcerer (I am levelling both at present) it took a while for it to sink in that I should not be trying to get involved in melee. In fact, when I played my first Flashpoint (Black talon) I was asked why I was using my lightsaber in combat. After being asked, I actually took a look at the damage it was doing and it was very minimal compared to my other ranged attacks. I suggest you do the same, do away with the lightsaber in fights.

Stuns/Interrupts

One other important tactic is the use of stuns/interrupts and slow attacks during fights, especially with bosses. I’m talking here about the Mind Snap, Force Stun and Force Slow if you are a Jedi Sage or Jolt, Electrocute or Shock attacks if you are a Sith Sorcerer.

You may not have noticed but the harder to kill elite characters and bosses often have special attacks that usually do significantly more damage than their regular ones. If you can prevent these attacks altogether (or interrupt them if they have already started) it can spare you or your companion a significant amount of damage. This is even more important in flashpoints when every enemy is that much harder to defeat.

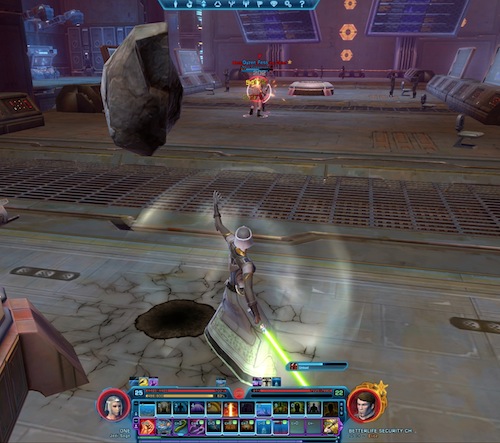
Watch for the blue bar on screen (below the red health indicator on your enemy).  If you see a blue bar moving from left to right it means a special attack is being charged – now is the time to issue a Mind Snap or a Jolt. Do that before the blue bar gets to the right hand side and it means you have prevented the attack from starting (also stopping the enemy from using that attack for 4 seconds). If it has already been cast you may see a blue bar moving from right to left (if it’s a damage over time attack).  Your interrupt will stop it dead in its tracks, meaning the rest of the damage is not inflicted.

See the image below of my Sage attacking a Betterlife Security Chief where he has already used his special attack (you can see the blue bar just above my companions).  It also serves as a reference of how far I suggest you stand away from the main fight.  No need to be any closer than absolutely necessary.

Likewise, stuns and slows do what they suggest they will – they can stun an enemy (preventing them from moving or attacking) or slow their speed down, allowing you (and your companion) to get some extra attacks in while it is in force. Most of these attacks have a cooldown before they can be reissued (for example Jolt/Mind Snap is 12 seconds) so in a big fight be sure to check when you can re-issue it. I’ve used this tactic in big battles with good effect.

Healing

I used to think this was a given but I have done a lot of flashpoints and teamed up with other Sage or Sorcerer players and I see them often not healing their companions. They just let their companion fight to the death and don’t attempt to heal them.  As a result they cannot handle the bigger fights easily or they can get overwhelmed if larger numbers of the enemy are involved.

The thing to remember with the Sage and the Sorcerer is that it’s the companion taking all the damage (Qyzen Fess if you’re a Sage or Khem Val if you are a Sorcerer).  These companions are good at holding aggro, ensuring the enemies keep attacking them rather than you. As a result it makes sense to heal them when their health is starting to get low, because if they are defeated guess who is going to be attacked next? I typically monitor the health of my companion during fights and when his health has dropped to around 25 percent or less, I stop attacking and focus on healing him.

With a boss fight I usually start healing when the health has dropped 40-50 percent since Bosses tend to do more damage and the more powerful healing spells take a while to cast.  The last thing you want to do is stop attacking to heal your character but find you have left it too late and he is defeated while you are still casting.  Not only have you lost the companion, but you have also not been inflicting any damage while you have been trying to heal. It can be a little unnerving focusing on healing when your companion is in a fight with 2-3 enemies and your natural instincts are to fight, but the thing to remember is, if your companion is alive its likely you are too! It can take a while to get the timing right but it’s an important skill to learn and will really help you in the tougher fights.


And as mentioned early, because you are a long way from the action (well out of melee range) – if it appears you cannot save your companion and looks unlikely that you are going to win, turn around, cast Force Speed and get out of there fast!

Companions Weapons and Armour

You should be continually upgrading your companion’s armour and weapons.  This ensures that they can inflict and absorb a lot of damage.  It also increases the threat level of your companion making it more likely he will be attacked and not you. It’s not uncommon in a big fight to find an enemy who is attacking you suddenly turn and race to attack your companion.  Some of this is because they have good armour and weapons, but also Qyzen and Khem Val both have good AOE (Area of Effect taunts) which they will use to ensure enemies attack them and not you. As a worse case scenario you can cast something like a Cloud Mind, which reduces your threat level, but I almost never need to use this.

Remember the Force Armor/ Static Barrier

A cool defence against damage is Force Armor (Jedi Sage) and Static Barrier (Sith Sorcerer).  This protects you from a high amount of damage for 20 seconds but also has a 20 second cool down. My rotation before attacking usually consists of casting this first, then instructing my companion to begin an attack, followed by casting a ranged attack with a long activation time like the Jedi Sage’s Mind Crush. That way, in most fights my companion has reached the enemy as my first ranged attack hits them, my shields (Force Armor or Static Barrier) are up, and I am in the position to start my attack with instant ranged attacks.


So there you go.   These are pretty basic tips I know, but I have found them to be quite valuable and they collectively helped me get out of some tricky situations, sometimes when the odds are stacked against me.

I hope you enjoyed this article.  I’ll be back next week with more Consular and Inquisitor tips.  If there is anything specific you would like me to cover, or have any comments feel free to leave your thoughts below, I would love to hear from you!